


It probably doesn’t need to be explained to anyone that the ability to stop quickly is the basis for safe riding on a unicycle. So it’s worth knowing how to carry out brake adjustment on a bicycle – in order to save a visit to the service center and be able to do it yourself when needed on the road. Fortunately, simple tools, good intentions and basic technical skills are enough to adjust the brakes on a bicycle.
What will you learn from this post?
- How do you know when there is something wrong with the brakes?
- How to adjust the brakes on a bicycle?
- What will you need to set the brake on your bike?
At a glance
Efficient brakes are essential for safe driving. So it’s worth checking their condition regularly, and making the necessary adjustments if necessary. This activity is not particularly complicated, but it varies depending on the type of brakes.
How do you know when it’s time to adjust your brakes?
The most common signs that there is something wrong with the braking system are extended stopping distances and a delayed response to tightening the handles. Any kind of strange sounds, such as squeaking, ringing or rubbing noises, should also be of concern. The above symptoms can also be related to pad wear, so it is worth checking the condition of the pads before adjusting the brakes on your bike. If you can’ t see the notches on the linings (V-brake) or the retaining plate starts to show through from under the l ining (disc brakes), it’s high time for a replacement. It is also worth checking the condition of the cables and armor – they should be clean and move smoothly. Cracks, kinks, fraying and rusting are signs that they too are eligible for replacement.
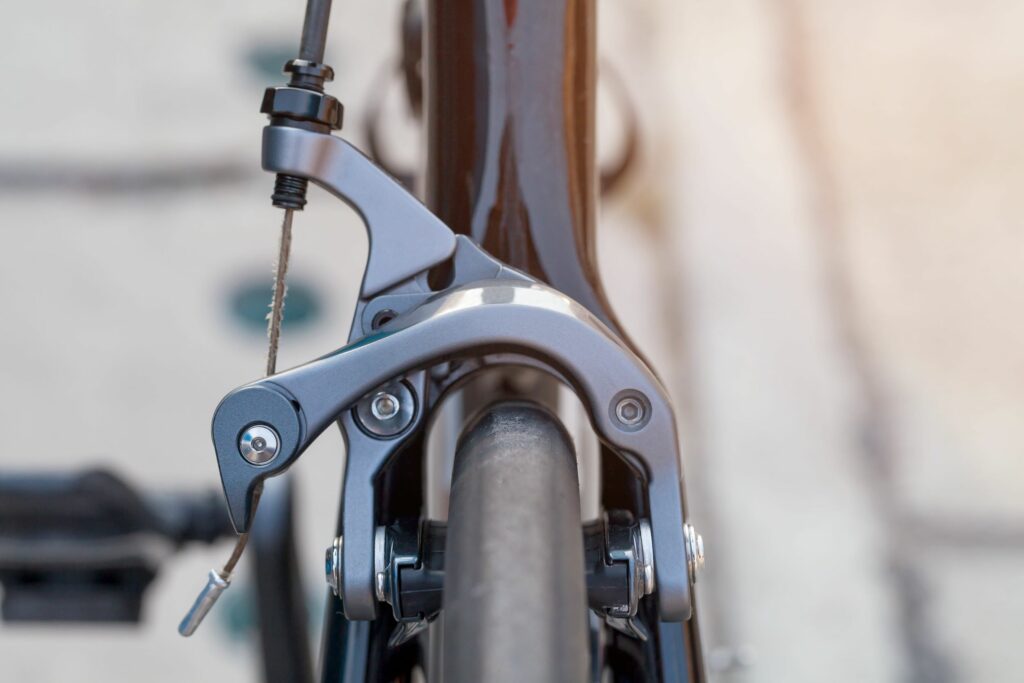
Adjusting the brakes on the bike: V-brake
V-brake is one of the most popular types of bicycle brakes, which are found on city and trekking models and some mountain models. Most often, they require adjustment when the arms with pads are arranged in the wrong position relative to the rim. Fortunately, setting the brake on a bicycle is not difficult at all. A 5 mm Allen, a screwdriver and a bike service stand will come in handy, which will make the job much easier.
We start by unscrewing the screw attaching the cable to the brake arm, unfastening the pipe and loosening the pads with an allen. Then press the pads against the rim with your fingers and position them so that they adhere to the rim with their entire surface, parallel to each other, about a millimeter below the edge of the tire. Once set, tighten the pad bolts, fasten the pipe, press the pads against the rim and lightly tighten the cable. Then we loosen the line by 1-2 mm and tighten it with a screw. Finally, it’s a good idea to check that the pads press evenly on the rim when the handle is pressed. If not, in the pad that touches the rim more firmly, tighten the adjusting screw by a quarter turn, and in the other pad loosen the screw by the same amount. Check the effect and, if necessary, repeat the operation until both pads press evenly. After adjusting the brakes on the bike, it’s time for a test ride.
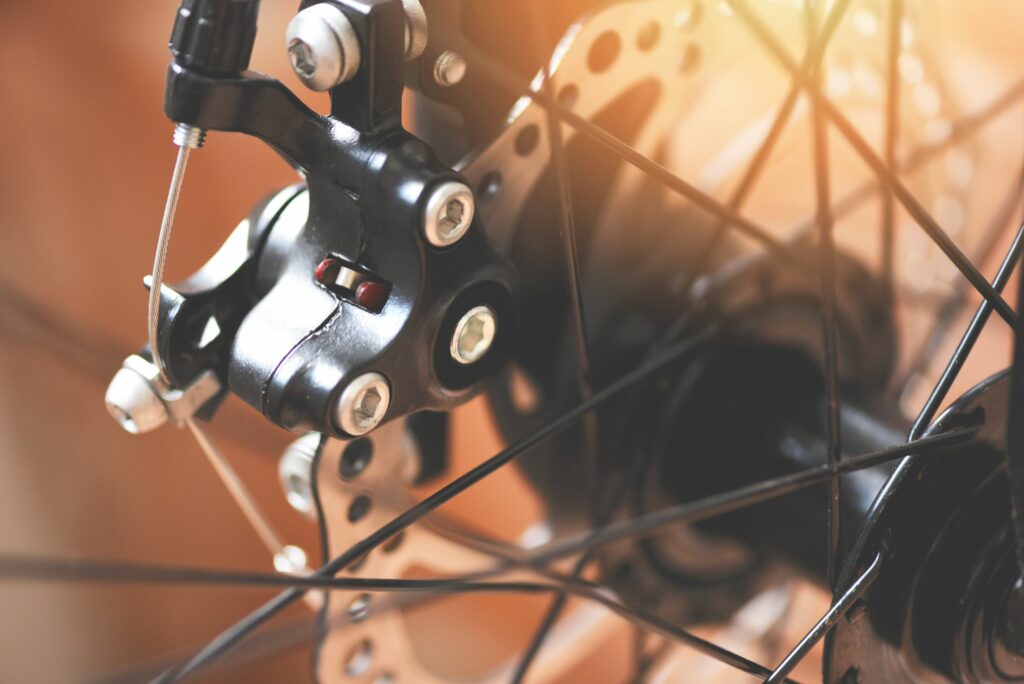
Adjustable brakes on the bike: disc brakes
Disc brakes stop the bicycle due to the friction of the caliper against the disc in the wheel hub. They are heavier than V-brakes, but they perform better in mud and rain, and they allow more precise adjustment of braking power. There are two types of disc brakes: mechanical and hydraulic. In the first, less popular system, the brake is actuated by a steel cable, while in the second the braking force is transmitted by a fluid. The method of adjusting hydraulic and mechanical brakes is similar, but varies from manufacturer to manufacturer. Below we describe the general scheme of operation for hydraulic models, but we recommend reading the instructions for the specific model before proceeding with the deed. For adjustment, in addition to a 5 mm Allen (or torx), a practical stand or hanger for the bike is also useful.
Adjustment of hydraulic brakes on a bicycle is most often needed when the caliper is misaligned with respect to the disc. In this situation, we loosen (do not unscrew!) the bolts holding the caliper to the fork or frame, and then press the brake handle so that the linings press against the disc. Holding the handle, gently tighten the mounting screws, taking care that the clamp does not move. Finally, we check that the facings are aligned parallel to the disc, with equal distances on both sides.
A good bike service rack or stand will make any repairs and adjustments much easier. It will give free access to all components and stabilize the unicycle in place. This is the basis of any service, even something as simple as brake adjustment. When your bike falls over and you have to hold it down, it takes a lot longer to fix and costs a lot more nerve. If you frequently tinker with a unicycle, a rack or service hanger will be a good investment. You can find proven models at rtrbikes.com.
Image source: shutterstock.com